Pages

December 21, 2012

Inspiring Christmas Spaces

Our home projects are still in full swing and I promise to update everyone on the progress soon.   Since the house is in a bit of honey-do chaos, it is not the time for me to decorate for Christmas. 

In the meantime, I drool over the pretty pictures I see in the blogs I follow and I look forward to decorating next year!

Here are some fantastic, inspiring and fun Christmas ideas.


I love the colors of nature in this room.  The pine cone on display is a great touch of whimsy.


Lighted branches are always fun.

Classy and whimsy are perfectly combined in this wreath.

Evergreens dress up these lighted branches and create a very welcoming front porch.


You should have guessed I would add some burlap to these inspiring Christmas spaces!

Hopefully these spaces inspired you a little bit and now you are ready to go out and do.

Merry Christmas!

November 19, 2012

Our New Art Gallery

When I decided to make my husband's photography a more prominent feature in our home, I transformed our main hallway into an art gallery.

To bring a final touch to this space, I named our hallway.  After all, doesn't every gallery have a name?  I went out on a creative limb and named it....Fiorucci Gallery.  My creativity sometimes astounds me.

I found the letters at our local craft store.  It didn't matter that they weren't the same color as I knew I would be painting them black anyway.  
The letters weren't on sale, and I had to pay full retail for them (those who know me just did a collective "GASP!").  The cost came to $28.00.

I spray painted the letters, using matte black paint, which I had around the house.


Here are the tools needed to hang the letters.


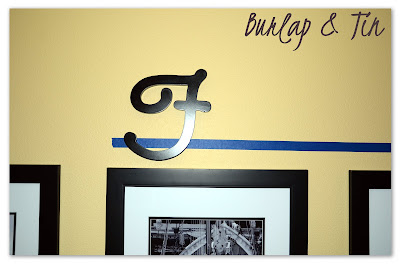
Using the painter's tape, I marked where I wanted the letters to hang on the wall.


Using the level, I made sure the tape was perfectly straight.  The perfectly-straight-tape will be my guide to ensuring I will have perfectly-straight-letters. 


The letters did not come with a way to hang them on the wall.  Rather than use tape on the wall, I drilled a tiny hole in which the head of a brad nail (finishing nail) could fit.


Once the hole was drilled, I placed the head of the brad nail into the hole and pushed it in as far as it would go.


Starting at the far left, I hung the first letter.  I wanted the "F" and the "G" to be offset just a smidgen from the other letters.  The two larger letters required me to hang a nail and use a hammer.


Second, I placed the last letter to the farthest right.  By using brad nails on the back of the smaller letters, I only had to push them into the wall just as you would a tack.

I worked my way toward each end alternating between words to ensure the spacing would come out correctly.  The last letter to be hung is the letter "G".


TA DA!  The finished project!


A simple idea that gives this space a finished look.


November 9, 2012

Inspiring Spaces

It's time for some weekend inspiration!

Below are just a few of my favorite spaces I stumbled upon this week.


I love the simplicity of the black and white. 
The faux fur on the chair brings a comfy element against the starkness of the white.


This is a perfect example of combining two spaces. 
The yellow on the wall is echoed in the next room with the yellow chair. 
The cubed space on the far wall is repeated in how the pictures are hung on the yellow wall. 


Not only do I love the color of the cushions, I love how it ties in perfectly with the trim of the house.  Gorgeous!


The kitchen island looks like a piece of furniture rather than cabinetry.  
This brings an element of uniqueness to this space and is further accentuated with painting it a color completely unexpected.


Hopefully you are inspired by this week's finds and get a creative bug to do something in your home this weekend. 

Now, go and do!


November 5, 2012

The Party Invitation

My siblings and I celebrated my Mom & Dad's 45 years of marriage and their 70th birthdays by throwing them a big party celebration.  One of my responsibilities was to make the invitations.  I have the most incredible parents in the world and I knew the invitations had to be just as special as they are.  No store bought cards would do.

Their wedding colors were red, white and black; this is what I used as my starting point.  After finding some beautiful papers, I went to work.

The tools I used:


I cut each paper to the size I needed for the card.  The paper cutter makes it a snap to cut each sheet of paper to the exact size needed.  This helps me tremendously in ensuring all cuts are the same.  What?  Me picky?


Next, place the photo squares (tape) on the back of the papers.  The corners that will be at the top and bottom of the card have tape in each corner, and the section of paper  in the middle of the card will have only one.  It makes a much nicer presentation when the corners are securely fastened and not peeling up when the person receiving the card opens it.

Some would use glue to adhere the papers together, however I found the paper wrinkles as the glue dries.  The tape makes a much cleaner presentation.


To separate the two black patterned papers, I wanted to add a pop of red.  To give it a different look, I tore an edge along the bottom of the strip rather than have it straight cut.  I like that it added something different.  I placed tape squares on the outer corners of the red strip.


I just LOVE the texture of the red paper.

To complete the front of the card, I added a strip of white paper with their names on it, a black swirl embellishment and a tiny flower. 

We can all use a little whimsy in our lives...


Place a tape square on each corner of the backside.  This will help in securely adhering it to the front of the card. 


This is how all the pieces came together.


It's always nice to add a little something extra to the wording on the inside.  Here, I cut out the wording of the inviation, taped it down onto black paper cut to size and then taped it all to the inside of the card. 

Very simple and adds just a small touch of elegance.


The finished project.
One down, only 39 more to go....


November 2, 2012

Inspiring Spaces

It's Inspiring Spaces Friday! 
Here are some of my favorite spaces I've come across this week.


I love the rustic wood used in this console table. 
I must say, it inspires me to make something of my own....


Isn't it great how the space that is often forgotten was made into built-ins? 
Giving it a dark color adds that special "pop" of color that is unexpected.


Mixing in stonework on the island with brickwork as the counter backsplash makes for this beautiful and organic space.  Love this!

Stonework as a placemat?  Genius! 
In fact, it has inspired me to do a project of my own.

You knew that would happen didn't you?

Hopefully you've been inspired a little today as well and your weekend can now be used to make your home a little bit more creatively yours.

Take what inspires and go DO.


October 30, 2012

Our Flooring Adventure Begins!

We purchased our home new from a local contractor in 1999.  Nothing needed to be done as everything was brand new, never been used and sparkly fresh.  Then one day, with hot water leaking everywhere from the hot water tank, we realized the house is no longer brand new.

And then I looked down.  At the carpets.  Oh boy.  No amount of deep cleaner could save them.  A house full of boys had become very evident on the carpet. 

Warning : looking down at your flooring, I mean really looking at the flooring, may cause you to want to rip it out and replace it.  Which may in turn cause you to buy your spouse's favorite drink, offer them a couple glasses with their favorite dinner before bringing up the subject of replacing the floor.  Be sure to include the favorite drink as part of your budget numbers.  Warning over.

After searching online and price shopping at several stores around town, I found THE one.


The wood grain reminds me of old barn planks which I absolutely adore.

We chose a glueless laminate flooring system 12.3 mm thick - the thicker the flooring the greater reduction in noise.  As much as we would have loved to put in real hardwood, the truth of it is this : we have boys who love being boys.  I do not want to have to worry about my boys damaging hardwood floors.  I want them to be kids too.

The other point we considered was : me.  I like to try things and then after so many years, I like to try new things.  I love the look of this floor and in 10 years if I decide I want to try something different, I won't feel bad doing so. 

It's always good for a girl to leave her options open.  (My husband is shaking his head).

The demolition begins in a few weeks and the goal will be to have it completed in time for the Christmas tree to go up on the 1st of December.  Wait, I'm running a marathon that weekend; we will have until December 4 to finish the floors. 

I just gave my husband 3 more days, isn't he lucky?!?

October 26, 2012

Inspiring Spaces


Every Friday  I hope to bring you some of my favorite inspiring pieces I've come across during the week.  I say "hope to" as I'm a busy mom and may not always have the time.  Super Mom - yes, Super Mom with a lot of spare time, no.

Here are some of my favorites I stumbled across this week.  I hope they inspire you to do at least one change in your home this weekend.


I love the big, white, fluffy comforter on this bed.  It invites me to curl up into it.


 I love, love, LOVE these floors.  A perfect combination of old and new is showcased with the wood floors and crisp white of the room.  Great design includes attention to little details.  The molding on the backside of each step in the staircase proves no detail is too small.


Here the octagon shape in the bookcase is carried through into the floor design. 
I love the boldness of the color as it defines a tiny corner that could otherwise be overlooked.


Those tiles ROCK.


Thank you for taking the time to enjoy what has inspired me this week.  A good rule to remember - even though something may not be your style you can always pull something from it that you do like; whether it be color, shape or the way something is laid out.

Take what inspires and go DO.

Enjoy your weekend!


October 18, 2012

A Monogram

Not that long ago I found myself with a little bit of free time.  Rather than do something completely productive - like going to the grocery store so my family could eat - I decided to spend some time walking around the craft store.  I hung the Bad Mom of the Year Award next to my marathon medals on  my wall.

Walking around the store, I could not remember the last time I had been there.  I felt as if I had walked into a gold mine of creative ideas.  As any woman on a budget, I checked out the markdown section and was happy to stumble upon a big letter "F".  It was big and heavy and black and I loved it.  As there were only two letters there - both the letter "F" (our last initial) - I just had to have it. (My husband is looking at me blankly right now.  Blinking.)

I had no idea what I was going to do with them, but that was beside the point.  Wasn't it?  Maybe?  (Husband's blank look again).

Imagine my shock when the checker rang it up and it was only ONE PENNY!!  I bought both.  I'm such a big spender.

Once home, I found an ugly picture frame I had purchased years ago for a dollar.  I removed the glass and backing.  I then spray painted the frame matte black.  Once the paint dried, I looked around my house to find a spot that needed a monogram.  The perfect spot was found above the walkway leading from our kitchen into the dining room.


A small project, that cost me a little more than a buck, gave me pizzazz in an often forgotten space.


What do you think?  I love it!


October 11, 2012

My New Front Porch

Working in the front yard one day, I was looking at my front porch and the only thought I could think of was BORING.


I saw you yawn.  It's ok.  It made me yawn too.


Then my son ran by me while playing tag with the neighborhood kids.  He was wearing a bright neon green shirt and it got my creative juices flowing.  I drove to the local hardware store and after staring at the many, many colors of spray paint I decided on two really fun colors ~ Green Apple and Orange.

Next stop was the fabric store.  I purchased two foam pads for $10 each bought 2 yards of outdoor fabric which was on clearance.  Oh how I love clearance!  The fabric came to $8. 

Last but not least, I had my eye on a big paper mache letter "F".  With only one left, I grabbed it as I knew I would kick myself later if I didn't.  Even the $10 price tag on the letter didn't deter me - I knew it would work perfectly for what I wanted to do.

Once I was home I got to work.  The longest part of the process was taping off the furniture for the spray painting.  After the painting, I tackled the pillows and then the monogram.

Without further ado, here is what I created in a single weekend.  No more boring front porch!


LOVE how the color pops bringing cheerfulness to our entry!


Many things I found laying around the house and repurposed them.  The great thing about paint is you can always change it.  It's that easy!
 Shortly after I finished, my neighbors wandered over and told me how much they love looking at my front porch and it brings a smile to their faces.  And that brought a smile to mine.


October 10, 2012

How To Have a Gallery Hallway

My husband takes fantastic pictures and I am always looking for a way to showcase them in our home.  I decided to turn our hallway into his very own art gallery.

This could pose only one problem ~ the pictures would have to be perfectly aligned or it would drive me crazy.  (Ok, I may have design OCD tendancies).  Here is the step by step and EASY process of how I got all 5 pictures to be perfectly aligned. 


The blank canvas I began with.

The tools you will need for this project :


Start by setting the picture frames apart roughly the distance you will want to hang them on the wall.  Once they are spaced the way you would like them, measure the distance between the hangers on two of the pictures.


Using painter's tape, rip off a section the distance measured between pictures. 

For my pictures I rounded up to an even 24 inches.


Grab two of your handy-dandy picture hangers.  I hold them in my mouth.  You might not want to do that.


As I am hanging 5 pictures I am starting with the middle picture.  To find the exact middle of the wall, I measured the wall space I am using and divided by two. 

The area I am working with is 14 feet ~   divide that by two, and I knew I wanted my middle picture to be placed at the 7 foot mark.

Here I placed the edge of the painter's tape at the 7 foot mark and worked my way to the right.


Check to make sure the painter's tape is level on the wall.  The great thing about painter's tape is you can easily adjust it if you need to.


Place a picture hanger in the same spot on each end of the tape. 

To keep it simple, I used the upper corner each time.  I am not an expert picture taker (thus the big shadow in the middle of the picture) but you can see where I placed my hangers at the same spot on each end of the tape.


Repeat the process by simply moving the tape over using one of the hangers you just hung as your starting point.

You can see the blue tape between picture 2 and 3.

Continue on until all your pictures are hung.


Just look at how straight those pictures are!


Ta Da!  The completed project.  Well, almost complete as I have yet another idea brewing.