Pages

July 25, 2013

Were You Raised In A Barn?!

Summer is in full swing at the Fiorucci house and with it is lots of outdoor fun.

Our sliding door receives much use as it is the main entrance into the backyard
and all the neighborhood fun that awaits.
We have more people knocking at our sliding door than we do our front door in the summer months!

Spending the winter laying down new wood floors, I often thought about how to protect them from the summer's sun.

Do I go back to curtains and cover up the big, new and beautiful trim I just put up?


When indecision plagues me like this I don't do a thing.
I have learned if I don't love it as an idea, I won't when it's done.

Then an opportunity came-a-knockin'.  
While sitting at my desk at work, a man came in to take care of an order he wanted.
As he leaves he asks me if I have horses.

I must admit, this is the strangest question I've heard at my work.
Telling him no, I asked him why.
Seems he had been working on a horse barn that day and salvaged 
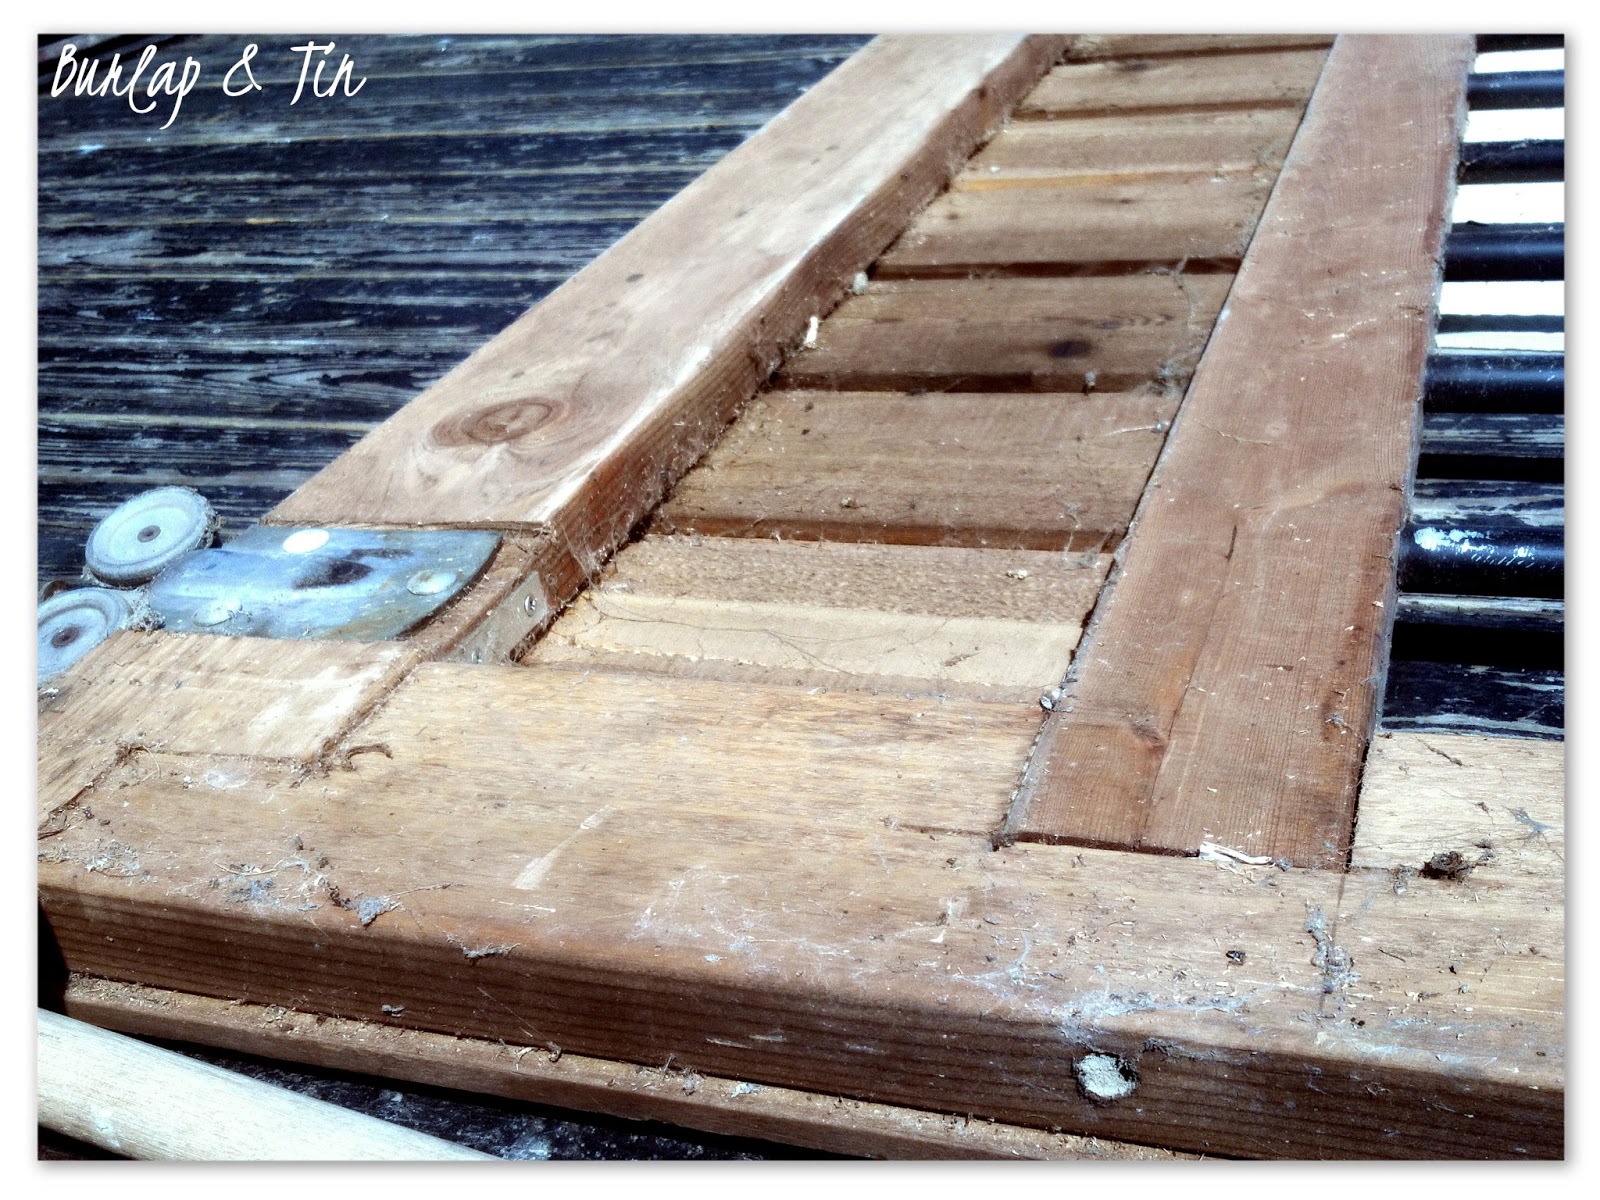
a cedar and steel horse stall barn door with it's track and thought if I had horses I might want it.

I may have squealed.
Ok, I did.

I leapt out of my chair and followed him to his truck and bought it on the spot.
For fifty bucks.  FIFTY BUCKS.
What a bargain - which totally appealed to my Dutch heritage.

This bad boy is going to be my new "curtains" for my slider.


Pardon the fact the door is laying on it's side.


This is the backside which will be visible in the family room.
The possibilities are endless what I can do with this blank slate.
The rustic look of this door makes me swoon.

My boys run in and out of the slider door several times a day and as with most kids, quite often forget to close the door.

When staring at a wide open slider door, I will admit I often ask my kids
"What?  Were you born in a barn?!?!"

Now they will be able to answer, "Well, kinda Mom. And it's your fault."

Until then, this is what I have to get working on.
Cleaning up thirty plus years of barn life.

I can hardly wait until this project is complete!


June 11, 2013

New Doorways Say HELLO!


Our doorways said nothing.
Not even hello.  Or goodbye.
 
We wanted them to say something, anything really.
 
So when changing out the trim in our home, we decided
the doorways also needed a little change.

The doorways in our home were sheet rock only.
No pretty wood.
No pretty molding.
Nothing that spoke of originality.

They were painted, and that was about it.


To bring more character into our house,
we added big molding around the doors.

What we used:
4 - 1x4x7 MDF
2 - 1x4x5 MDF
2 - 1x6x7 MDF
4 - 1x2x5 Primed Pine
Nails

Tools you need:
Miter Saw (or chop saw)
Tape Measure
Pencils - preferably a dozen; you'll use one, 
set it down, forget where you put it,
look for another one, use it, set that one down, 
forget there is one behind your ear,
forget one near the saw,
forget the one by the door,
...you are starting to get the idea.

First we measured the top of the inside of the doorway.
I then cut a 1x6 to fit the top.
Once the top was nalied in place, I measured 
and cut 1x6s for the sides of the door frame. 


The outside frame of the door was framed with 1x4.
Each piece was measured even with the top height of the 1x6.
Confusing right?
I circled below what I mean.


The top of the door way was framed by a 1x4 and 2 - 1x2s.
The 1x4 is cut to align with the far side of the 
1x4s framing the sides of the doorway.


Each 1x2 is 1 inch longer than the 1x4 on both sides.
The bottom 1x2 is nailed into place,
followed with the 1x4 and capped with the last 1x2.  
Each lining up with the other.

 
Here is a visual to give you an idea of what was done.


My next steps were filling in the nail holes and using caulk to fill in the gaps.
 
Caulk is a miracle worker and covers a multitude of imperfections.
Caulk will not, however, cover up the imperfection
of dirty clothes you notice your kids are wearing
as you head out the door to go to church.
Caulk can't do that.

The final step is one last coat of paint.

TA DA!


 A touch of character to a previously boring doorway!


Seeing them side by side shows what a big difference a little trim can do
to the look of a room. 

Wow.

May 27, 2013

Picture Perfect Old Window

The first house my husband and I bought when we were first married was 700 square feet of never-been-updated-1950's-pure-bliss.

I'm fibbing about the pure bliss part.
But it was our first house.

The little old man who owned it before us left lots of treasures in the garage, including storm windows for each of the windows on the house.

Shortly after moving in, we replaced all the windows leaving the storm windows in a forgotten corner.

When we moved 5 years later we left a lot of the original treasures and on a whim I told my husband to pack one of the storm windows into the moving van.  I thought I could put pretty papers in it and it would make a great picture.

A few short years later, old windows became in high demand on the brocante market.

I kick myself often for not taking more of those beauties.

We moved into our home in 1999, I put pretty papers in each window pane and hung that baby up.  
And never looked at it again.  ( <--- highly embarrassing)

As the remodel took shape this year and we stripped everything out of our home, I saw the old window for what it had become.

UGLY.

It's ok if you cringed.  I do too.

I decided if the hallway was to truly be a Gallery Hallway then why not add more pictures?

The best part?  It cost me a $1.48.

I looked through pictures of my boys and found some great personality shots.
I sent them to be printed to Office Max.
Office Max?? 
A little known fact:  Office Max will print your pictures 
on Engineering Paper (11x17) for pennies!!  
For this project it was perfect.  It is not on photo paper, 
so it best to use this service for a project like this or one that involves decoupage

Here is how I turned ugly into personality!

The tools you will need:
1.  Pictures printed on paper large enough to fit each frame.  
2.  A template the size of each window frame.
My frames are 11 1/2 x 10 3/4" and I used one of the papers previously hanging in the window.
3.  Painter's Tape
4.  Marker
5.  Paper Trimmer


Lay the template on the section of picture you want shown in each window frame.
With the marker, mark the photo at all four edges of the template.
Line the marks up with the blade of the paper trimmer and trim.
Important : If your window frame sizes are not square be sure your template is lined up on the paper the correct way.


Once all pictures are trimmed, arrange them how you want them placed in the window.
Be sure the tops of the pictures are placed at the top of your window frame.


Flip each picture over and using the painter's tape, tape each picture into place.


Here you see that one of my pictures was printed vertically making it a smidgen too short on the sides.  


No worries.

I taped the picture into place and grabbed some scraps that I had previously trimmed off.
I flipped the scraps over and used the white backsides to frame in the vertical picture.


With everything taped into place, I flipped it over
and hung it back on to the wall.

A reminder of where I started ....


...and what I have now!


It was such an easy and inexpensive project making it super easy
(and guilt free!) to change the pictures out often.

The entire project took less than an hour and cost less than 2 bucks.
My lattes cost more than that.

P.S.
I apologize for the glare on the window glass; 
no matter what angle I took the picture I just couldn't 
get rid of the closet door trim trying to take center stage of the picture.

Trim can be like that.

May 21, 2013

Bi-Fold Door Transformation


The hallway closet transformation is complete!

Here is the blank slate I started with.
Honey colored oak bi-fold doors are no more!


This is what we have now and I LOVE it!


I couldn't resist a fun and unexpected door handle.
Although we added a lot of satin nickel with our makeover,
I thought the oil rubbed bronze finish looks great with dark wood floors.


Updating the doors took a weekend of my time and cost less than $50.
If you want the step by step of how I did this transformation you can find that here.

The entry hall into our home is now bright and light 
and no longer feels like a dark tunnel.

Next time you are in the neighborhood, stop by and say hi.
When I open the door to greet you, 
this is the view you now see :

It is far from basic and it makes me smile to see
that fun and funky chandelier in our family room.

However, I think it's time to replace that light in the hallway.

"Oh Honey...." <---sung in a sweet and melodic voice.
(I'll let you know if the sweet tone works.) 


May 13, 2013

Bye Bye Blah Bi-Fold Doors

Our house was as builder-basic as they come. 
For a long time I lived with it, even though I didn't like it much. 
I always liked the look of trimmed-out doors, but not the price tags that came with it. 
Our bi-fold closet doors were blah and boring.  See?


With my son needing a project for his shop class, I knew exactly what we could do.  It was time to change out the big, blah, boring doors in our hallway.  I knew he had never done anything like this before and well, neither have I.  A perfect lesson for the both of us.

First I contacted my friend Harold at a local lumber yard.  
He let me ask him all kinds of really basic questions and I mean basic.  

I determined the look I wanted would require a 1/4" x 1 1/2" trim piece - the kind most commonly used in creating garden lattice.


Second, I drew the doors, took measurements and determined the layout of the doors.  
Now fully armed with the knowledge of the measurements, I handed my son a tape measure and had him do exactly the same thing.  

After all, this was his school project.


We determined we needed :
8 boards 6½' long
2 boards 4' long
3 boards 3' long
Light grade sand paper
Primer
Paint
Wood Glue


New Door Pulls - a girl has got to have her bling!


First, we sanded the doors.
Then with the doors still hanging, we measured (twice!), 
cut and then glued our pieces into place.

Our ever so professional blueprint.


After talking with our local hardware store,
we decided super-duper-don't-get-it-on-your-fingers glue was best.

Whoa Nelly, is that stuff powerful!


The glue worked great and even allowed for a 10 to 15 seconds of adjustment time.


Here is our first piece glued into place.


Each bi-fold is framed with trim pieces reaching from top to bottom.

When placing the outer most trim pieces it is imperative to leave
approximately a 1/4" gap.
This allows the doors to open and fold.

Without the tiny gap, you will not be able to open the doors as the trim will butt up against the door frame.


The good news - although the gaps may look glaring to you,
no one will notice them once the project is completed.


I promise.


Once all the vertical pieces were up the 

top and bottom pieces were glued into place,
followed with the middle piece.


Now that you have a top and a middle section on the first bi-fold,
simply divide each section in half to place the final two pieces.


With one bi-fold completely finished, the other three go by
quickly as you no longer have to measure each section
but simply line them up to each other.


Next is the priming and then the painting.
The glue adheres best when wood meets wood,
this is why the priming and painting are not done before.


Here is my work station.  It's a piece of cardboard.

It's awesome.


Next week I'll show you the the completed project.

I'm happy to report, m
y son's project got an "A"!


April 15, 2013

Breakfast Bar Re-Vamp


When deciding on the changes I wanted to incorporate into our home, 
I spent countless hours flipping through magazines and being inspired on Pinterest.

To narrow our taste to a certain style is nearly impossible ~ it is a modern-meets-contemporary-meets-shabby chic.

The dark floors and white cabinets brought in strong clean lines and I wanted to break that up with a pop of unexpected.  
I knew I did not want to use bead board on the breakfast bar as it had been done too often and is too expected.

What to do that is unexpected?  Batten & Board.   
Batten and board?  Batten & board! 
And do it in a completely different color.

Here is my blank canvas.


Armed with lots of questions, and not certain of all we needed, 
we visited a local lumberyard to try and put the ideas in my head into a reality.

The salesman that helped me was extremely professional yet the look in his eyes 
told me loud and clear he thought I was a tad on the crazy side.  
I solidified his thinking when I told him I needed the board and batten to be rough-sawn.
Still the professional, he showed me the perfect pieces.
As we left the store, he shook his head and stated,
"I have never sold board and batten for the inside of a home before.  I've been in the business a lot of years."
I promised to bring him before and after pictures.

Now for the fun part.
I removed the trim pieces and then went to work on removing the counter braces.
That was a lot of nails!

Although I wanted the rough-sawn look, I lightly sanded the board and batten.
This ensured a rough look with a smooth finish.

Next came the staining.
Walking the aisles of a big box store I stumbled upon the perfect color in their mis-tint section.
The absolute perfect color cost me $2.50.  
BARGAIN!
Bargains always make me happy.


This color is the most delicious brown-grey color.
It looks fantastic against the white cabinets and dark flooring.

First I cut and nailed the plywood to the face of the kitchen bar.
Next step was trimming the top, bottom, sides and corners with the 1x2 boards.
From there I needed to figure out how close I wanted the rest of the boards to be to each other.
Once I determined the distance, I used a scrap piece to "cheat" my measuring.
I simply laid the cheat piece against the outside of the first board and the second board would then be set at the outside of my cheat piece.

Hopefully this explains it a little more clearly than I can:


My Cheat Piece saved me a lot of time.
Nail a board down, lay down the Cheat Piece, nail the next board down.
Repeat.


The new counter brackets cost $10 a piece and although 
they are a different wood than the board and batten, 
held the stain and matched perfectly.


Once it was finished, it transformed the look of the kitchen.
The grey color in the stain continues the contemporary element 
all the while the board and batten brings in a hint of a farmhouse feel.

A touch of unexpected.
Which, in essence, is what life is all about isn't it?


Bringing in the board and batten was a simple project which did not cost a lot of money (less than $100!) and it took only a few hours of my time.

An easy, cheap and fun project ~ the best kind of project!

P.S.
As promised I returned to the local lumberyard to show the 

salesman my before and after pictures.  
The look one his face was priceless.
My guess is next time he won't be so leery of my ideas.
And we all know there will be a next time.


April 8, 2013

Helloooo Kitchen Cabinets

Oak, Oak, Oak.
It was time to part ways.
Our builder-basic home said nothing of originality nor did it even whisper a hint of our style. 
Armed with a small budget, we tore up old flooring and laid down new floors.

I spent countless hours sanding, priming, painting, cutting and staining the cabinetry.
We are thrilled ecstatic with the results.
Ok, I may be the one who is ecstatic as I am no longer spending every waking moment outside of work with a paint brush in my hand.
And if I'm ecstatic, everyone needs to be too.
Or in the very least, pretend to be.

Here is a reminder where we started.


This isn't so much a before shot as it is a during shot.
The walls and ceiling have been painted.
The oak trim is gone from the floors and windows.
The new floors are down.


The view from our family room.

And here is what we have now.
TA  DA!


I love the look of board and batten and incorporated it into the cabinetry. 
I think it brings just a hint of farmhouse, don't you?
There will be more on that later.


 Just a splash of red.


It is amazing how much brighter and open the kitchen appears.
We often hear "WHOA, it's so much bigger in here!" when family and friends see the space for the first time;

which is exactly the goal in mind.


 The hardware on the cabinets are custom, to replace them would have cost us a fortune.
Instead, my husband sanded them down and I spray painted them.
They turned out fantastic.


To add a touch of whimsy, our monogram was incorporated into the design.

Well, there you have our latest redesign.
So much hard work and absolutely worth it in the end!

Over the next couple weeks I will spend time redecorating the kitchen, adding hardware and creating a fun back splash with an idea I have brewing in my head.

I'd love to hear what you think, do you love it as much as we do?
What was a favorite change you've made to your space?


March 25, 2013

Keeping It Real

It's easy to stare at pictures of beautiful rooms and swoon over their beauty.

It's easy to look at a design element in someone's home and decide to incorporate it into your own.

It's easy to find inspiration.

It ain't easy livin' in the Land of Inbetween.
You know the place ~ the land you live in while taking what you had and turning it into what you want.

It's scary.  And oh is it messy.

In my effort of keeping it real I give you, my friends, the Fiorucci Land of Inbetween.


This was our front porch while we were laying down the new floors.
Not very welcoming is it?


While putting up the new trim, our front living room and dining room was my painting station.
Just want to curl up on that sofa and share a cup of coffee don't you?


The seemingly endless task of painting cabinet doors took over the living room and dining room.


All available counter space was used for stacking drawers to be painted. 
There were plenty of days where it was difficult to find space to simply make a sandwich.


As we did all the work ourselves, we lived in a state of disarray for 3 solid months. 

There were days it seemed unending. 

There were days I thought I would go crazy. 

There were days the only sanity I found was sipping a glass of red wine while sitting on the corner of the bathtub because it was the only clean room in the house.

The only way to live in the after picture is traveling through the Land of Inbetween.

Just don't park there.

Up next, our beautiful revamped kitchen!